Farlanki.

学习ODRefreshControl

字数统计: 898阅读时长: 4 min
2016/03/30 Share

ODRefreshControl是一个刷新的指示器,效果不错.
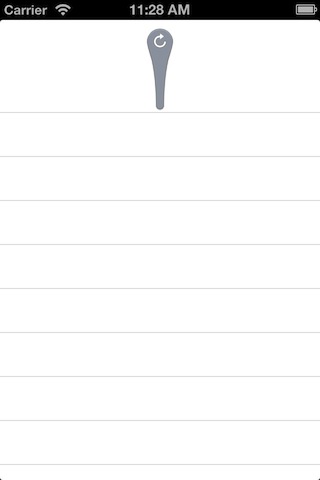
1
2
3
4
5
6
7
8
9
10
11
12
13
14
15
16
17
18
19
20
21
CGFloat verticalShift = MAX(0, -((kMaxTopRadius + kMaxBottomRadius + kMaxTopPadding + kMaxBottomPadding) + offset));
CGFloat distance = MIN(kMaxDistance, fabs(verticalShift));
CGFloat percentage = 1 - (distance / kMaxDistance);

CGFloat currentTopPadding = lerp(kMinTopPadding, kMaxTopPadding, percentage);
CGFloat currentTopRadius = lerp(kMinTopRadius, kMaxTopRadius, percentage);
CGFloat currentBottomRadius = lerp(kMinBottomRadius, kMaxBottomRadius, percentage);
CGFloat currentBottomPadding = lerp(kMinBottomPadding, kMaxBottomPadding, percentage);

CGPoint bottomOrigin = CGPointMake(floor(self.bounds.size.width / 2), self.bounds.size.height - currentBottomPadding -currentBottomRadius);
CGPoint topOrigin = CGPointZero;
if (distance == 0) {
topOrigin = CGPointMake(floor(self.bounds.size.width / 2), bottomOrigin.y);
} else {
topOrigin = CGPointMake(floor(self.bounds.size.width / 2), self.bounds.size.height + offset + currentTopPadding + currentTopRadius);
CGFloat height = self.bounds.size.height;
if (percentage == 0) {
bottomOrigin.y -= (fabs(verticalShift) - kMaxDistance);
triggered = YES;
}
}

这部分计算了一些接下来用到的值.
currentTopPadding:图像离顶部的距离currentBottomRadius:图像离底部的距离
bottomOrigin:底部半圆的圆心
topOrigin:顶部半圆的圆心

1
2
3
4
5
6
7
8
9
10
11
12
13
14
15
16
17
18
19
20
//Top semicircle
CGPathAddArc(path, NULL, topOrigin.x, topOrigin.y, currentTopRadius, 0, M_PI, YES);

//Left curve
CGPoint leftCp1 = CGPointMake(lerp((topOrigin.x - currentTopRadius), (bottomOrigin.x - currentBottomRadius), 0.1), lerp(topOrigin.y, bottomOrigin.y, 0.2));
CGPoint leftCp2 = CGPointMake(lerp((topOrigin.x - currentTopRadius), (bottomOrigin.x - currentBottomRadius), 0.9), lerp(topOrigin.y, bottomOrigin.y, 0.2));
CGPoint leftDestination = CGPointMake(bottomOrigin.x - currentBottomRadius, bottomOrigin.y);

CGPathAddCurveToPoint(path, NULL, leftCp1.x, leftCp1.y, leftCp2.x, leftCp2.y, leftDestination.x, leftDestination.y);

//Bottom semicircle
CGPathAddArc(path, NULL, bottomOrigin.x, bottomOrigin.y, currentBottomRadius, M_PI, 0, YES);

//Right curve
CGPoint rightCp2 = CGPointMake(lerp((topOrigin.x + currentTopRadius), (bottomOrigin.x + currentBottomRadius), 0.1), lerp(topOrigin.y, bottomOrigin.y, 0.2));
CGPoint rightCp1 = CGPointMake(lerp((topOrigin.x + currentTopRadius), (bottomOrigin.x + currentBottomRadius), 0.9), lerp(topOrigin.y, bottomOrigin.y, 0.2));
CGPoint rightDestination = CGPointMake(topOrigin.x + currentTopRadius, topOrigin.y);

CGPathAddCurveToPoint(path, NULL, rightCp1.x, rightCp1.y, rightCp2.x, rightCp2.y, rightDestination.x, rightDestination.y);
CGPathCloseSubpath(path);

这部分是进行绘制的.先绘制顶部半圆,然后调用 CGPathAddCurveToPoint 方法,将曲线接到顶部半圆的终点,再绘制底部半圆,再用曲线将底部半圆的终点和顶部半圆的起点连接.
这里使用的 CGPathAddCurveToPoint 方法会将路径的当前点和由参数指定的目的点连接,其余两个参数作为控制点,控制曲线的弯曲程度.
CGPathAddArc 方法会绘制一部分圆弧,并且把路径的当前点移到圆弧的终点.

因为使用KVO观察了scrollViewcontentOffsetcontentInset的值,所以每当这两个值改变的时候-observeValueForKeyPath:ofObject:change:contex:这个方法就会被调用,这个方法里相应的绘制过程就会被执行.

1
2
3
4
5
6
7
8
9
10
11
12
13
14
15
16
17
18
19
20
21
22
23
24
25
26
27
28
29
30
31
32
CGFloat radius = lerp(kMinBottomRadius, kMaxBottomRadius, 0.2);
CABasicAnimation *pathMorph = [CABasicAnimation animationWithKeyPath:@"path"];
pathMorph.duration = 0.15;
pathMorph.fillMode = kCAFillModeForwards;
pathMorph.removedOnCompletion = NO;
CGMutablePathRef toPath = CGPathCreateMutable();
CGPathAddArc(toPath, NULL, topOrigin.x, topOrigin.y, radius, 0, M_PI, YES);
CGPathAddCurveToPoint(toPath, NULL, topOrigin.x - radius, topOrigin.y, topOrigin.x - radius, topOrigin.y, topOrigin.x - radius, topOrigin.y);
CGPathAddArc(toPath, NULL, topOrigin.x, topOrigin.y, radius, M_PI, 0, YES);
CGPathAddCurveToPoint(toPath, NULL, topOrigin.x + radius, topOrigin.y, topOrigin.x + radius, topOrigin.y, topOrigin.x + radius, topOrigin.y);
CGPathCloseSubpath(toPath);
pathMorph.toValue = (__bridge id)toPath;
[_shapeLayer addAnimation:pathMorph forKey:nil];
CABasicAnimation *shadowPathMorph = [CABasicAnimation animationWithKeyPath:@"shadowPath"];
shadowPathMorph.duration = 0.15;
shadowPathMorph.fillMode = kCAFillModeForwards;
shadowPathMorph.removedOnCompletion = NO;
shadowPathMorph.toValue = (__bridge id)toPath;
[_shapeLayer addAnimation:shadowPathMorph forKey:nil];
CGPathRelease(toPath);
CABasicAnimation *shapeAlphaAnimation = [CABasicAnimation animationWithKeyPath:@"opacity"];
shapeAlphaAnimation.duration = 0.1;
shapeAlphaAnimation.beginTime = CACurrentMediaTime() + 0.1;
shapeAlphaAnimation.toValue = [NSNumber numberWithFloat:0];
shapeAlphaAnimation.fillMode = kCAFillModeForwards;
shapeAlphaAnimation.removedOnCompletion = NO;
[_shapeLayer addAnimation:shapeAlphaAnimation forKey:nil];
CABasicAnimation *alphaAnimation = [CABasicAnimation animationWithKeyPath:@"opacity"];
alphaAnimation.duration = 0.1;
alphaAnimation.toValue = [NSNumber numberWithFloat:0];
alphaAnimation.fillMode = kCAFillModeForwards;
alphaAnimation.removedOnCompletion = NO;

这部分负责拉动到临界点然后图像消失的动画.
先创建一个 CABasicAnimation 类的对象,指定动画的类型.

1
CABasicAnimation *pathMorph = [CABasicAnimation animationWithKeyPath:@"path"];

然后设置动画

1
2
3
4
5
6
7
8
9
10
pathMorph.duration = 0.15;
pathMorph.fillMode = kCAFillModeForwards;
pathMorph.removedOnCompletion = NO;
CGMutablePathRef toPath = CGPathCreateMutable();
CGPathAddArc(toPath, NULL, topOrigin.x, topOrigin.y, radius, 0, M_PI, YES);
CGPathAddCurveToPoint(toPath, NULL, topOrigin.x - radius, topOrigin.y, topOrigin.x - radius, topOrigin.y, topOrigin.x - radius, topOrigin.y);
CGPathAddArc(toPath, NULL, topOrigin.x, topOrigin.y, radius, M_PI, 0, YES);
CGPathAddCurveToPoint(toPath, NULL, topOrigin.x + radius, topOrigin.y, topOrigin.x + radius, topOrigin.y, topOrigin.x + radius, topOrigin.y);
CGPathCloseSubpath(toPath);
pathMorph.toValue = (__bridge id)toPath;

再为指定的layer添加动画

1
[_shapeLayer addAnimation:pathMorph forKey:nil];

这样,就可以对其相应的属性添加动画效果.
为shapeLayer的shadowPath属性添加的效果亦同理.
如果要为透明的属性添加效果,那么就可以这样创建 CABasicAnimation :

1
CABasicAnimation *shapeAlphaAnimation = [CABasicAnimation animationWithKeyPath:@"opacity"];
CATALOG